Salesforce Backup and Restore
Salesforce backup and restore, protect your organization from permanent data loss and corruption by automatically generating backups. Create backup policies and restore data in just a few clicks.
Backup and Restore Setup
Follow these instructions to install the Backup and Restore Managed Package, license, and permission sets.
Install the Backup and Restore Managed Package.
-
- Purchase Backup and Restore, you find a URL in your order form to download the Backup and Restore managed package.
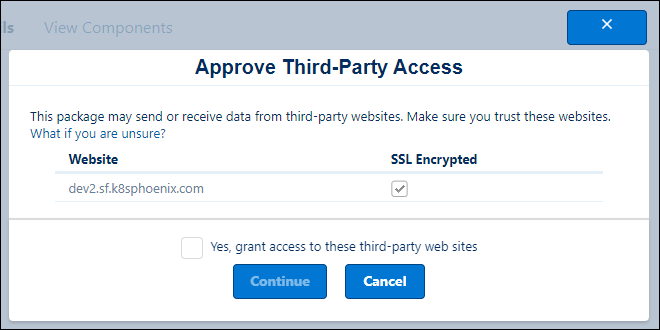
- From the Managed Package page, select Install for Admins Only. If you’re prompted to approve third-party access, select Yes, grant access to these third-party web sites and then click Continue. Although
dev2.sf.k8phoenix.comisn’t a third-party URL, Salesforce uses this domain to support the Backup and Restore process. You receive an email notification that the package is installed.
 - From the Backup and Restore dashboard, click the Settings tab.
- From the dropdown menu, select the desired AWS region for the backup.
- If you have no IP restrictions, in your org, click Provision Resources.
- Add the IP address for the Backup and Restore provisioning API (3.219.91.219), to the Login IP Ranges and then click Provision Resources.
The list of IPs that populate are specific to the AWS region that you selected to provision resources.
- Add the IP addresses that appear under Inbound IP Addresses from BAR Application to the Login IP Ranges for your user profile.
- Add the IP address for the Backup and Restore provisioning API (3.219.91.219), to the Login IP Ranges and then click Provision Resources.
- To connect to the AWS Storage using OAuth 2.0 Web Server Flow, click Enable OAuth.
- Click Test End-to-End Connectivity.
- Assign a Permission Set License to an admin user. From Setup, in the Quick Find Box, enter
Users, and then select Users. Select the users that you want to grant access to Backup and Restore. From Permission Set License Assignments, click Edit Assignments, and select Backup and Restore User. - Assign a Permission Set to an Admin user by selecting a user. Click Backup Restore under Available Permission Sets and click Add. Save your changes. Save your changes.
- From the App Launcher find and select Backup and Restore.
- To create a backup policy, from the Backup tab click New .
- To see the objects to be backed up, select the Data card and click Next. Objects not supported for backup, Considerations.
- Click Status to activate or select an object to be backed up.
- Save your changes.
Restore Data from a Backup
- From the Restore tab dropdown, select the object that you want to restore and the type of change in the record.
- Select the backup that you want to restore from.
- Click Retrieve Records from Backup
- To preview the time between the backup and the current record, click the dropdown menu.
- Select the records that you want to restore, and then click Next.
- To confirm that you want to retrieve the records, click Restore and then Confirm.
- Retrievals run within 10 minutes of confirmation. Follow these instructions to view logs in Backup and Restore. These logs contain information about the status of various Backup & Restore policies and activity.
For more blog: Why Do We Choose Merfantz Salesforce Consulting Service
Reference from: click here

