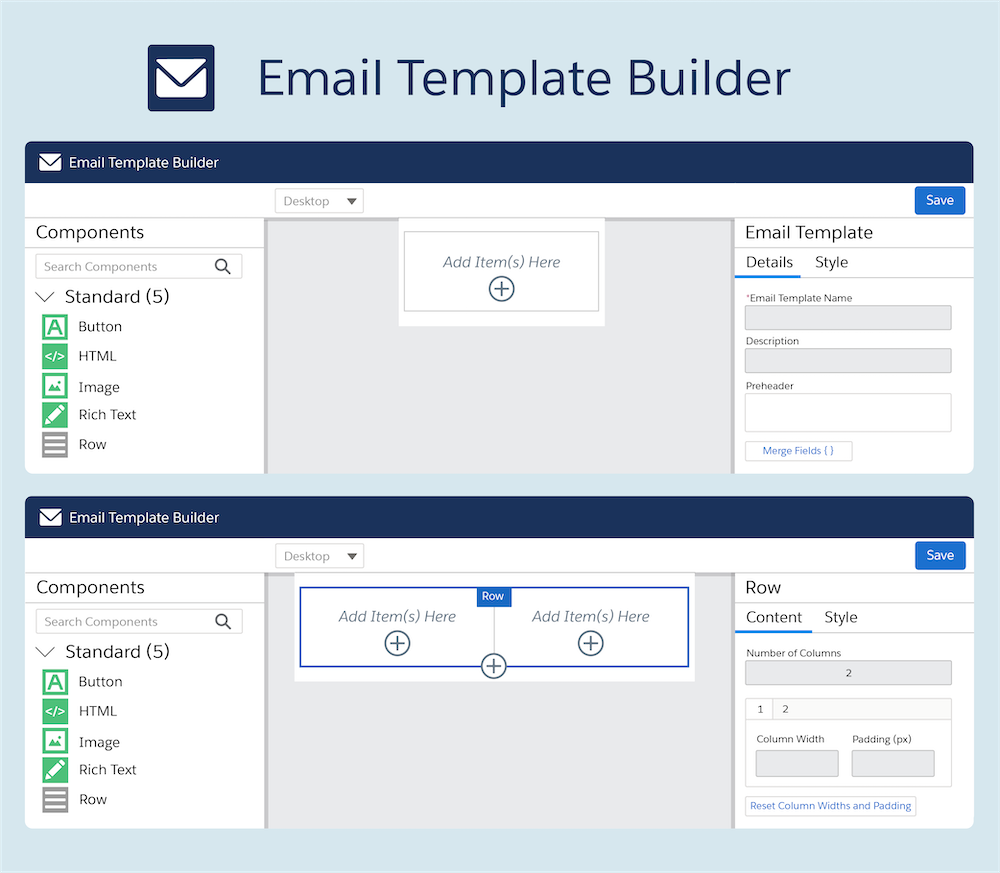
This is a new tool that is introduced with the Winter ’21 release. Use it to Create an Email Template Builder faster and more easily with visual tools. Users can drag elements such as HTML, Rich Text, Button, Image, or Row to create rich, visually appealing email templates. To allow users to access, create a permission set with Access Lightning Content Builder system permission enabled and assign it to required users Note: isn’t available for previously created Classic and Lightning email templates.
Considerations for Using Email Template Builder
Before setting up Email Template Builder, review this information.
- 1:1 Sales Cloud emails
- Case emails
- Docked Composer
- Email Global action
- High-Velocity Sales, using a sales cadence
- List Emails
- Experience Cloud sites
- Outlook or Gmail integrations
Internet Explorer 11 isn’t supported. Enhanced letterheads aren’t supported. There isn’t any API support, and we can’t create email templates using the API. For example, if we use the API to update the HTML Value field, the value is out of sync. Email Template Builder and Email Content Builder have these limits:
- 250 components per email template or email content record
- 100 components per region (component container)
- 10K characters for each component’s property value in the HTML Value field of the HTML component, clicking Format may push you over the character limit. In that case, can’t save your template. Undo the formatting or shorten the HTML and add another HTML block for the rest of the content.
Create and Edit Email Templates in Email Template Builder
Use email templates to save time and standardize emails sent by others in your organization.
- Go to the Email Templates home.
- Click New Email Template. Fill out the New Email Template window, and then click Save
 The next screen shows the email template details page for your new template. Click Edit in Builder.
- Add a subject. To include merge fields in the subject, type them in manually.
NOTE can’t edit the subject.
- The Email Template Builder appears.

-
- From Setup, in the Quick Find box, enter Permission Sets, and then select Permission Sets.

- Create a permission set, and then select System Permissions.
- Click Edit, choose the Access Drag-and-Drop Content Builder permission, and click Save.
- If necessary, click Manage Assignments to assign the permission set to users. Add components to the template, and customize them in the properties panel. Click Save, and then click the Back icon to return to the Email Template home page.
Now can use the new template in an email or list email in Lightning Experience or in Pardot content emails.
Select Who Can Work in Email Template Builder
To allow other users to create templates, give them the Access Drag-and-Drop Content Builder permission. Any user that can send can insert email templates made with an email or list email

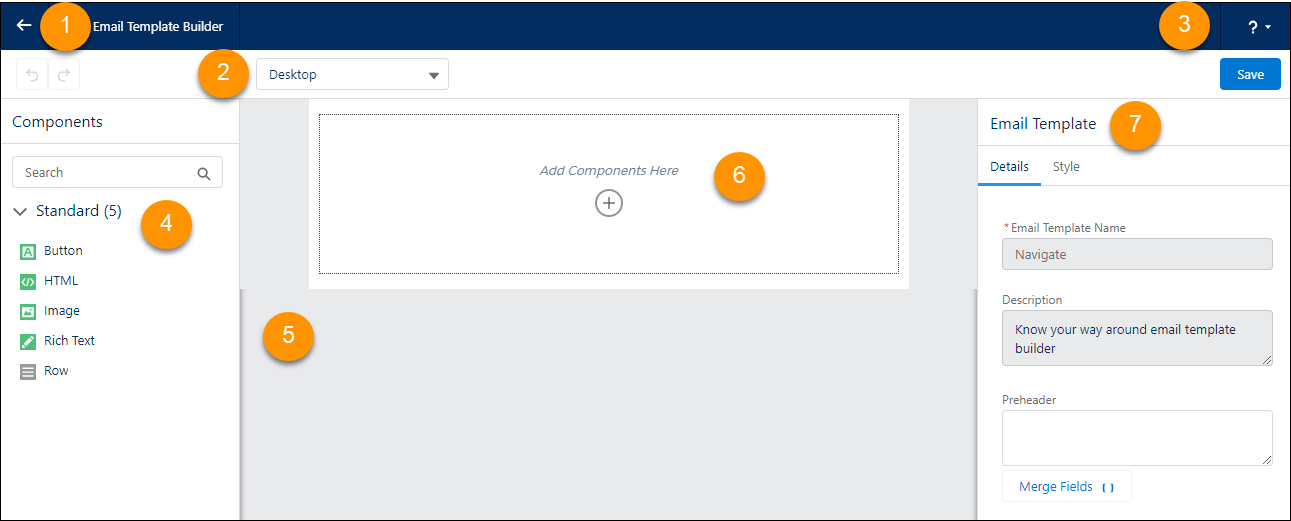
- Back Button (1)Use the Back button to return to Salesforce and email templates. Preview Mode (2)Preview the template in different modes, such as desktop and phone. Salesforce Help (3)Open the help menu to access Salesforce Help, videos, and other resources. Components Panel (4)See the available components for your template. Canvas (5)Use components to create your template on the canvas. To add a component to the canvas, drag it from the panel or click + to select. Default Row (6)All components are placed in rows. This row is the default row for a new template. Add a component to it or create more rows. Property Panel (7)The property panel shows what can be changed about the component. Change settings in both tabs. Style a component’s properties in the Style tab.
Use Email Template Builder Templates in Lightning Experience
Anyone who can send an email can insert a public email template. Start an email or list email.- In the email composer, click the Template icon.
- Choose an Email Template Builder template.
Reference from: click here


