Introduction:
In today’s digital world, establishing a strong online community is vital for businesses. Salesforce, a leading customer relationship management (CRM) platform, offers a powerful feature called Community Cloud that enables organizations to connect and engage with their customers. One key aspect of leveraging Community Cloud is creating a community user for Salesforce contacts. In this blog post, we will guide you through the process of creating a community user, step-by-step. So, let’s dive in and explore how you can harness the power of Salesforce Community Cloud to enhance your customer relationships.
Understanding the Importance of Community Users
Increased Customer Engagement:
Firstly, they actively participate in discussions, share ideas, and collaborate with other users, loyalty, and advocacy towards your brand. Moreover, this engagement creates a platform for customers to connect, express their opinions, and build relationships.
Self-Service Support:
Empower customers to find answers to their questions, access knowledge articles, and troubleshoot common issues independently. By reducing reliance on traditional support channels like phone or email, customers can swiftly resolve their problems, and heightened customer satisfaction.
Feedback and Ideation:
Basically, provides valuable feedback, suggestions, and ideas, driving product enhancements, innovation, and business growth. By leveraging the collective wisdom of the community, organizations gain insights and align their offerings precisely with customer needs, boosting customer satisfaction.
Support Ticket Deflection:
Furthermore, users with self-service capabilities, organizations curtail the volume of support tickets submitted through traditional channels. Consequently, this reduces costs and enables support teams to allocate more attention to intricate issues that necessitate specialized assistance.
Security and Access Control:
Salesforce’s robust security features certainly enable organizations to establish granular access controls for users. This ensures the safeguarding of sensitive information, allowing only authorized users to access specific data and functionalities, bolstering data protection measures.
Overall, by fostering engagement, self-service support, personalization, feedback collaboration, advocacy, ticket deflection, and robust security, community users drive a thriving and beneficial ecosystem that benefits both customers and organizations alike.
Firstly,
Here in this post I will explain you how to enable community and how to create communities.
How to enable community in Salesforce?
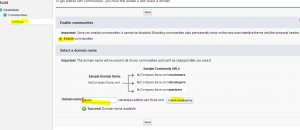
To enable community in Salesforce go to setup -> Build -> Customize -> Communities and click on settings. and check enable communities check box and enter your domain name and save it.
Note: You cannot change your domain name once you save it. This domain name will be used in all of your communities.
See the below screen for reference.
in the above screen Check availability button is used to, the domain entered by you is available or not.
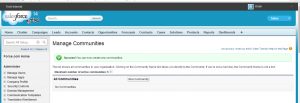
Once communities is enabled new header will be enabled in your salesforce org, there you can swipe between multiple communities. See the below screen for reference.
How to create communities in salesforce?
To create, first go to setup -> Build -> Customize -> Communities -> Manage Communities -> and click on New communities’ button . And enter name, description and URL and click on create button.
How to manage community?
Once community is created, that is only visible to only administrators until you publish it or share the URL. After creating the community you will navigate to following screen.
Also,click on EDIT button to manage the community you just created. After clicking on edit you will be navigate to below screen.
Features in detail
In addition, the “Members” feature is used to add members to the community, allowing individuals to join and participate in the community’s activities and discussions.
The “Tabs & Pages” button is used to manage which tabs are available to the community and override the home page with a visualforce page. This functionality gives administrators control over the navigation and layout of the community, ensuring that relevant tabs and pages are accessible to community members.
Moreover, The “Branding” button is used to add a header and footer and change colors within the community. By utilizing this feature, administrators can customize the visual appearance of the community, creating a cohesive and branded experience for community members.
In the first place, The “Login Page” button in Salesforce community allows adding a logo and defining login options for external users. The “Email” button specifies the sender email for notifications, branding, and templates. The “Miscellaneous” button provides features like content flagging, private messaging, and designating knowledgeable individuals.
How to add members to your salesforce communities?
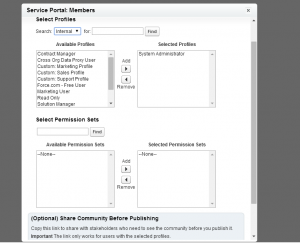
In the same way, to add members to Salesforce communities based on profiles and permission sets. To do this, navigate to Setup, then go to Build, Customize, Community, and finally, Manage Communities. Edit your community and select the Members option. From there, you can add the profiles or permission sets that you want to grant access to the community.
See the below screen for reference.
Step by Step guide to create a community user for Salesforce contact
To create a community user for a Salesforce contact, follow these steps:
- Go to Setup > Contacts.
- Find the contact you want to create a community user for.
- Click the Actions menu and select Enable Customer User.
- In the Enable Customer User dialog box, enter the following information:
- User Name: The user name for the community user.
- Password: The password for the community user.
- Profile: The profile that the community user will have.
- Click Save.
Here are some additional things to keep in mind when creating a community user for a Salesforce contact:
- The contact must be associated with an account that has an account owner who is assigned a role.
- Secondly, must have a valid email address.
- The community user must have a password that is at least 8 characters long and contains at least one uppercase letter, one lowercase letter, one number, and one special character.
- The community user must be assigned a profile that has the appropriate permissions for the Salesforce customer community.
Following, you can send the user an email with their login information. The email will include the user’s user name, password, and a link to the Salesforce customer community.
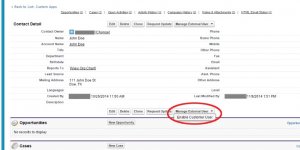
From a contact’s detail page, click on the button labeled “Manage External User”. You should get a drop-down that says “Enable Customer User” (assuming you have a Customer Community). Select that option to enable the contact as a Community User.
From there, it will take you to a New User Screen where you’ll need to make certain you’ve selected the correct User Profile to use for the contact in your Community and whether or not to enable various features for them like Chatter along with setting their User Name, Alias and so forth.
Benefits of Using Community
Communities offer numerous benefits to companies using Salesforce. Firstly, they help build better customer relationships. Additionally, they facilitate the solving of complex organizational problems. Moreover, communities benefit multiple departments within the organization. By leveraging communities, companies can save time and cut support costs, leading to increased customer satisfaction. Furthermore, communities drive product innovation and contribute to the growth of customer retention.
Moreover, communities improve the digital customer experience and boost new customer acquisition. Lastly, communities strengthen sales by increasing upsell, cross-sell, and add-on revenue. Salesforce provides an exceptional framework for extending the organization to external communities through Experience Cloud License, offering customization, mobile-friendliness, scalability, and rich personalization options.
Salesforce offers three key types of communities that cater to different groups of community members:
- Customer Community: This type of community serves as a self-service portal for customers, providing support, feedback, and access to relevant information such as FAQs, articles, documentation, and discussions with other customers. Salesforce customer communities aim to enhance the customer experience, increase engagement, and foster collaboration among customers.
- Partner Community: Designed for B2B organizations, partner communities enable sales teams and resellers to access necessary data and collaborate in real-time. These communities serve as information hubs where partners can manage their businesses, learn best practices, receive support, and securely connect with Salesforce employees. Partner communities facilitate efficient collaboration and help close more deals.
- Internal Employee Community: Internal employee communities act as portals for HR and IT information within an organization. They provide employees with a central space for connecting with one another, sharing files, accessing searchable knowledge databases, training materials, schedules, project management, and organizational documentation or announcements. Internal employee communities streamline communication, facilitate knowledge sharing, and improve organizational efficiency.
FAQ S
What are community users in Salesforce?
Firstly, they are external users who can access your community. You can assign the required permissions to the community users to access records.
Can a user be a contact in Salesforce?
A contact is someone related to your customer or partner (typically Accounts in Salesforce). In Experience Cloud, contacts who login to your portal are also users.
How do I add multiple users to a Salesforce account?
Depending on how many users you want to add Select New User (single) or Add Multiple Users (up to 10). Select User Licence – this will decide the Salesforce accessibility for each user. This is where you would set up the Identity Licence. Select Profile for the user. Save.
To Conclude:
Merfantz seamlessly integrates with both Salesforce user licenses and Partner Experience Cloud Licenses. This ensures that all activities and data from business units and distributors are continuously synchronized with Salesforce, regardless of the license they have.
In contrast to Salesforce Inbox, which lacks advanced features such as automatic data capture on distributor accounts, the Merfantz plugin for Outlook and Gmail offers comprehensive functionality for both primary accounts and subaccounts of all distributors. It is particularly optimized for use with Partner Experience Cloud License, providing the best experience and performance.
Source: Trail head

