Introduction
Transitioning from traditional data management and marketing methods to a unified Salesforce approach brings forth a plethora of advantages. By blending the robust capabilities of Data Cloud and Marketing Cloud, organizations gain invaluable insights into customer behavior, and engagement patterns. Altogether, they create highly personalized and targeted marketing campaigns, maximizing customer reach and driving conversion rates.
Throughout this guide, we will delve into the step-by-step process of integrating Data Cloud and Marketing Cloud in Salesforce. We’ll cover essential techniques to consolidate data sources, eliminate silos, and establish a cohesive data-driven marketing framework. This integration not only enhances efficiency and productivity but also enables businesses to build stronger with their customers.
Know your Data
Data Cloud is optimized for messaging using Journey Builder. Audiences can also include enriched unified individual records and new records, but we cover that in a later unit.
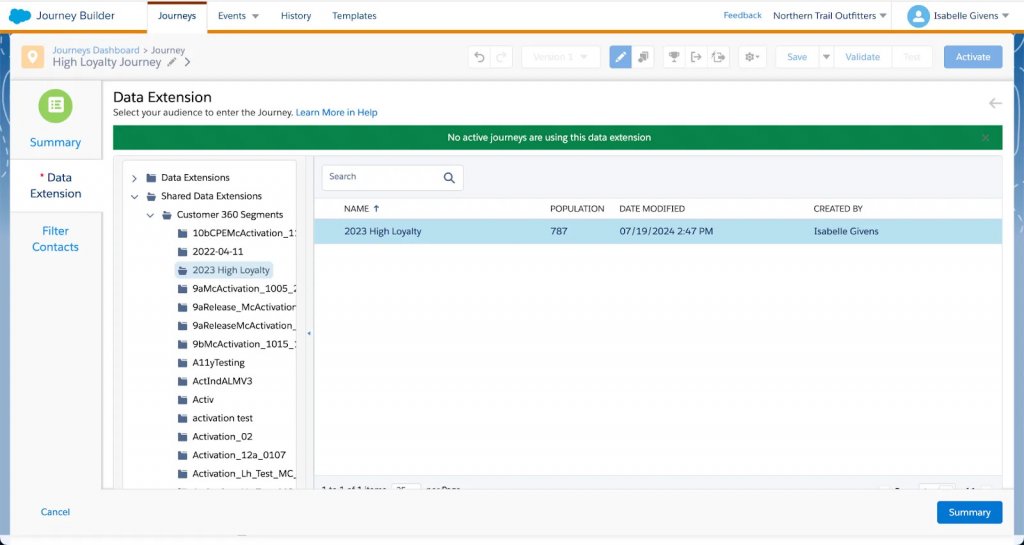
Isabelle probably already knows where to find her audiences in Journey Builder. When building a journey on the canvas, select the audience in the Data Extension Entry Source in Journey Builder.
But since Isabelle wants a more personalized experience using her new Data Cloud segment, she selects her audience from the Data Cloud Segments folder in the Shared Data Extensions folder in Marketing Cloud.
Journey data preserves the state of a contact’s data at the moment an entry event fires, facilitating the use of that data throughout a journey. Contact data captures the data values in the event source data extension at the time when Journey Builder evaluates it. Both are uniquely useful in journey creation.
Know Your Data Segments in Data cloud!
In standard segment activation, you can schedule batch or incremental refreshes to your audiences. For existing segments, Data Cloud performs a full overwrite of the activated data extension and replaces all rows in the data extension.
Contacts who have fallen out of the segment since the previous segment refresh don’t re-enter the journey. They will continue through the journey until they are explicitly removed by a process you’ve defined such as exit criteria, for example.
In rapid publish activation, though rare, Data Cloud can trigger a full overwrite refresh even if you’ve selected an entry process of evaluate new records only.This option updates incrementally. Depending on your journey’sentry settings, this could result in a contact being inadvertently entered into the journey.
Consent Is Important
These best practices make the journey much smoother for her and her customers.
- We recommend managing consent as you’ve always done in Marketing Cloud. For example, filtering consent criteria for entry source configurations, decision splits, or publication lists.
- If the activity appears later in the journey, we recommend using a Decision Split instead of filtering consent criteria for entry source configuration.
- To configure an email activity to use a Data Cloud audience and exclude contacts who’ve opted out, assign a publication or suppression list in Marketing Cloud for more consent management options.
Model Your Data Foundation in Marketing Cloud
When you use Data Cloud to power customer engagement (and we hope you do), think about intentionally structuring your data foundation instead of activating the same data repeatedly.
First, determine the best model for your data foundation. Then initialize your data foundation by using Data Cloud to activate core audiences to Marketing Cloud. Finally, establish your data foundation by connecting the resulting data extensions to the appropriate Marketing Cloud Contact Model.
Core Audience Model
Using the core audience model, you create two activations in Data Cloud—one activation at the Individual level, and one at the Unified Individual level. Each activation contains your organization’s full active audience and all your required content personalization and decisioning attributes chosen by your organization.
Collective Core Audience Model
Your marketing team chooses 2–15 groupings to organize the commonly shared attributes. For example, Identity & Consent or Demographics & Psychographics.
When choosing a model, there are a few things to take into consideration.
Consider your use case and include the audience and all of the attributes to capture for personalization and decisioning. For example, contacts who purchased running shoes during a specific sale and spent at least $100.
Use a core audience model for attributes that you’ll use repeatedly.
Use a collective core audience model when the core model might be too complex and it’s better to segment it for more specific use cases.
Activate the Core
Once you choose the model for your foundation, you need to create core activations in Data Cloud.
- Create a segment in Data Cloud.
- Create one or more Data Cloud activations.
- Select channels and contact points for your activations.
- Organize and include commonly shared attributes for each activation.
It’s All Relative
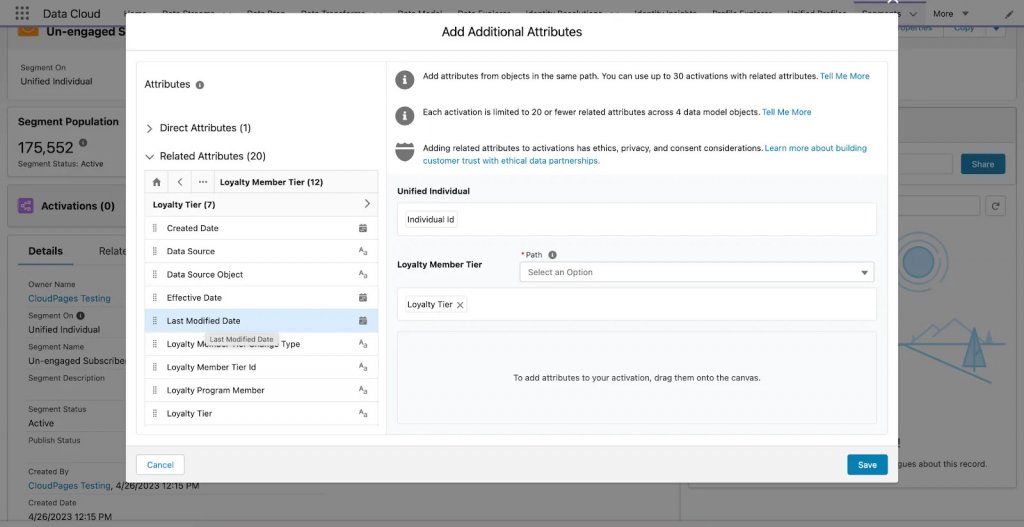
While you’re activating your core, you can personalize Marketing Cloud communications using direct and related attributes from Data Cloud. This practice helps you control the volume and variety of data that can be used in marketing segments.
- Direct attributes (1:1): Attributes that have a direct relationship in a data model object, meaning a user has only one value, for example, postal code or first name.
- Related attributes (1:N): Attributes that have a one-to-many (1:N) relationship, meaning they could have many values per attribute for a specific user, for example, purchases or email events.
Here’s an example of adding some related attributes to an SMS campaign in a Marketing Cloud activation.
Embed this foundation across Marketing Cloud
First, use static journey data for content personalization for both audience-based journeys that use data extensions and event-triggered journeys that use data actions or API for journey entry.
And when activating audiences from Data Cloud, we recommend including all attributes that are required to personalize the content throughout the targeted journey.
- If you use AMPScript personalization strings, these strings reference journey data in the data foundation you already created.
- AMPScript functions and data extensions lookups pull the most up-to-date information about your audiences.
You can find more tips and tricks in Use Data Cloud Data Throughout Marketing Cloud.
Now that you’ve built your awesome foundation, check out how to use this foundation to create omnichannel journeys.
To stage your data in Data Cloud
To build an omnichannel journey, use Data Cloud and build a Unified Individual that represents a single person consisting of separate Marketing Cloud channel-specific SubscriberKeys (Individuals) and contact points.
A Unified Individual is a grouping of separate Individual profiles that relate to a single Unified Individual profile. These relationships are based on your Identity Resolution and Reconciliation Rules. To include attributes from multiple Individuals into a single data extension row, segment and activate audiences at the Unified Individual level.
Define Match Rules for Identity Resolution and Relate Separate Individuals
Relate your separate Individuals to a Unified Individual using Identity Resolution. This example assumes that you can externally collect FirstName, LastName, EmailAddress, and/or PhoneNumber for each channel SubscriberKey. You then import the external data from three different systems, one for each channel, and map it accordingly. The imported SubscriberKey is linked to the Individual ID in Data Cloud. Using these match rules, Identity Resolution relates the separate Individuals, representing a person’s various Marketing Cloud SubscriberKeys, to a single Unified Individual.
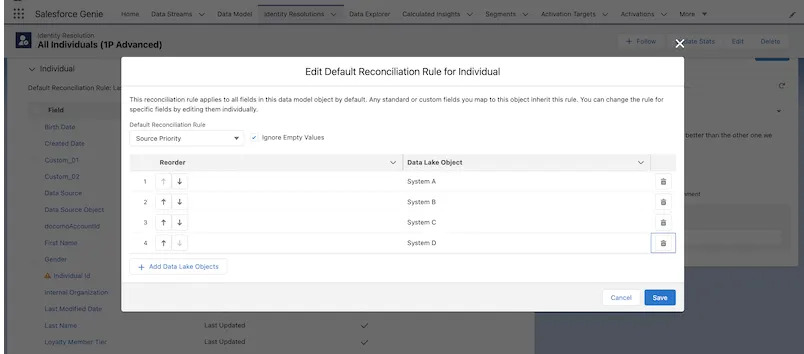
Define Reconciliation Rules to Prioritize Values for the Unified Individual
Reconciliation rules specify how to select the best value for a Unified field when that field can store only one value, such as a person’s first name.
Create a Calculated Insight to Select a Subscriber Key
Data Cloud has numerous controls to select and activate a channel contact point. However, for some scenarios, you must create a Calculated Insight to filter or select a specific channel contact point.
The Calculated Insight output includes the attribute MobilePush Key, which you can add as a direct attribute when you activate the Unified Individual. This action ensures that the activated data extension in Marketing Cloud has the contact point values for the Email, SMS, and MobilePush channels. Journey Builder can use these contact points to orchestrate omnichannel journeys.
Start by creating your audience.
- Create a segment to qualify the correct Unified Individuals.
- Activate the audience with applicable contact points and attributes.
Next, set your journey connections.
- Firstly, Update the send relationship on the activated data extension.
- Configure journey entry to use the activated data extension audience.
- Configure journey settings to use the desired send address.
- Also, add consent or preference filters as needed.
Now you know how Data Cloud and Marketing Cloud work together to tailor your communications with your customers and create a great marketing experience.
FAQ s
- How does Marketing Cloud integrate with service cloud?
Marketing Cloud Connect requires the Contact ID in Service Cloud to be the primary subscriber and contact key. Reference implementations are developer-enablement frameworks that accelerate cross-cloud integration by providing code, configuration, and implementation patterns.
2. What are the ways data can be added into Marketing Cloud?
There are several methods available for creating data streams in Marketing Cloud Intelligence. You canuse an API connector to connect via API, TotalConnect to upload external files, LiteConnect if you have data from a single source, or even Granular Data Centers if you have granular data.
For More Blogs: Click Here


