Introduction
An ANT Migration Tool is a Java-based command-line utility for transferring metadata between a local directory and Salesforce Org. It proves invaluable for retrieving or deploying Salesforce artifacts stored on a local machine using a user-friendly command line interface. This blog provides information on the ANT Migration Tool, including its definition and steps for installation and usage. Additionally, it highlights the reasons for utilizing the ANT migration tool, emphasizing its benefits.
Ant Migration Tool can be useful in the following scenarios:
- Firstly, Quick test environment configuration
- Retrieve and deployments of components.
- Quick and efficient changes in a few components at the same time
- Metadata migration between many different environments
- Metadata migration to prod environment.
1). For multiple setup changes
Initially, if there is a development project for which you have to set up the testing environment with a lot of setup changes, then you can use ANT migration tools in that case. Moreover, making these changes with the help of a web interface is usually time-consuming and tough to manage.
2). For multistage release process
A typical development process certainly follows iterative building, testing, and staging before a product is released to the production environment. A scripted retrieval or deployment of components can make this process more efficient, and this is possible through ANT migration tools only.
If you are just starting your career in Salesforce, consider going for a Salesforce Cloud Certification to move your career on the right path.
3). For repetitive deployment
If you need repetitive deployment, then you should use ANT migration tools. It allows you to retrieve the metadata in your organization, make edits, and deploy a subset of components. To repeat the process several times, you just have to call the deployment target again.
4). For scripted deployment
If someone prefers deployment in a scripted environment, then ANT migration tool can be the most familiar process here.
5). For scheduling batch deployments
If you want to deploy any product in midnight without disrupting users, you can pull down changes every day with ANT migration tools.
As we have discussed in the introduction part, An Ant Migration Tool is a Java-based command-line utility for transferring metadata between a local directory and Salesforce Org. So, what is Salesforce Metadata API? Let us discuss the same in our next section in detail.
Additionally, we will delve into the Salesforce Metadata API, which is a comprehensive topic. We will explore its details and functionality, shedding light on its significance within the Salesforce ecosystem.
Metadata API – What you need to know?
The Metadata API is a collection of objects that store customized information for an organization and allow manipulation of these objects through SOAP calls. Here are some key facts about what the Metadata API can do:
- It works with setup configuration as XML metadata files.
- It can migrate configuration changes between organizations.
- It can create a set of tools to manage the organization and application metadata.
Although organizations can write their own apps for using Metadata API and SOAP calls, Salesforce offers ANT migration tools to retrieve and deploy metadata and APEX. Metadata API usually work in a package-centric way that contains one or more components as per the requirement. It is possible installing packages from Salesforce AppExchange. At the same time, ANT migration tools in Salesforce are limited to work in a single package or there is no package at all. A package can be divided into three major categories.
Key Benefits Of Ant Migration Tool
- Basically, the ANT migration tool provides users with complete control over the deployment of metadata, allowing for precise and granular management of the moved data.
- Provides 360-degree visibility into the changes being deployed.
- Allows the developers to adopt an innovative development approach as Ant can be integrated with source control systems
- The deployment process automated and controlled more accurately with the help of ANT Migration.
- Enables deployments of components and configuration of the quick test environment.
- Further, ability to schedule deployments to run whenever they want or pull down changes by integrating Ant with other automation tools.
In terms of packaging components, there are three types to consider:
- Unpackaged: This package includes native components present in your organization, such as standard objects. These components are not bundled within a specific package.
- Unmanaged Package: These packages are commonly used to distribute open-source templates or projects, serving as building blocks for applications. Once installed, the organization can edit the components retrieved from an unmanaged package. Developers who created unmanaged packages have no control over them after installation. It’s important to note that unmanaged packages should not be used for migrating components between sandbox and production organizations. Change Sets are preferred for such migrations.
- Managed Packages: Managed packages are collections of application components packaged as a single unit and listed on AppExchange. They have a namespace or license associated with them. Multiple organizations can install and use a single managed package. Unlike unmanaged packages, managed packages can be effectively managed even after installation. However, certain components within managed packages may be obfuscated to protect the intellectual property of the organization.
How to Install Ant Migration Tool?
Step 1: First, we need to install Java JDK. Here is the step of installation.
- Download JDK from https://www.oracle.com/technetwork/java/javase/downloads/index.html
- Secondly, click on JDK and note the installation path during the installation. My path was C:\Program Files\Java\jdk1.8.0_45.
- After installation, we can verify the version by open Command Prompt and using the java -version.
Step 2: Now, we need to install the Apache Ant. Here is the step of installation.
- Later,download Apache Ant version 1.6 or later from http://ant.apache.org/bindownload.cgi.
- Now in detail we need to extract the zip file. To create a new folder and extract a zip file.
Step 3: Now straightaway we need to install the Ant Migration Tool. Here is the step of installation.
- Download the zip file of the Spring 19 release from here:
- Extract the downloaded zip to a folder where we extracted the Apache Ant.
Step 4: After installing both JDK, Apache Ant, and ANT Migration Tool, we need to set the environment variable set. Let’s follow the following steps:
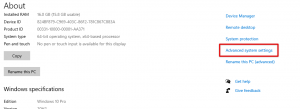
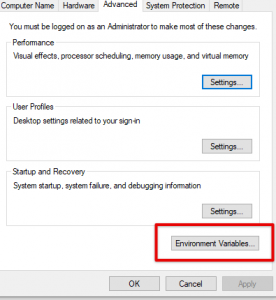
- Right-click on the ‘This PC’ – Properties – Advanced System Setting.
- Further click environmental variables.
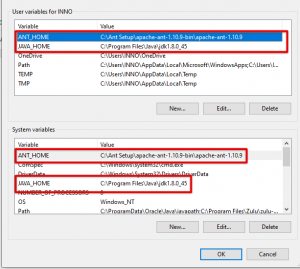
- Now Add two variables ANT_HOME and JAVE_HOME.
- Furthermore, click on the new add variable name and their respective path for both the User and System variables.
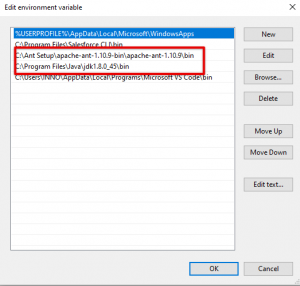
- Now you need to make sure that both the path of ant and java JDK should be available in the system’s path variable and user variable. If it is not available, then add both paths.
Step to Retrieve information: ANT Migration Tool
Step 1: Establish the connection on Org.
- Secondly, Open the Salesforce_ant_50.0 Folder and open the Sample Folder.
- Now open the Build file.

- After opening this file, certainly make sure that your IP address is whitelist in your org.
- Open the Build file and enter your credential from where we need to retrieve information and the URL of the

- After this, we need to open another file.
- Follow the path Salesforce_ant_50.0 -> Sample -> codepkg.
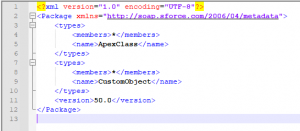
- Now open the package with notepad++.
- Also, you can edit the file which you want to retrieve.
- Overall, if you want to retrieve everything, you need to describe the type and name of the information.
- Now open the command prompt and change the directory where your Ant setup is available or open it directly from the setup location.
- Likewise write the command as ant retrieve Code and enter.
Steps To Deploy Information
Overall,to deploy this metadata to the Destination org, we need to change the credentials in the build.properties file. Then need to replace the username / password+token and server URL with the right Destination values.
- Now edit the package file with the information you want to deploy.
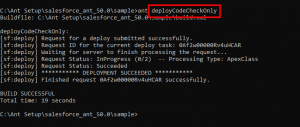
- Issue the command: ant deployCodeCheckOnly This will Validate the deployment without actually deploying it on the Destination org, just like your standard Change Set validation. You can see the validation result on the Destination org as well on the Command Prompt
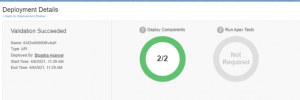
- Hence you can check your deployment status by login in to the org and go to the setup and search deployment status in the quick find box and select.
To Conclude:
This comprehensive guide provides valuable insights on the installation and usage of ANT migration tools in Salesforce. It offers a step-by-step process for successful installation, ensuring a seamless experience. To expand your understanding of Salesforce and related concepts, consider joining the Salesforce certification course at JanBask training. This course offers practical knowledge and equips you to become a valuable IT resource and a sought-after Salesforce professional.
FAQ s
- What is the Ant tool used for?

