Introduction
Firstly, we will explore how to enhance Salesforce CPQ, now a part of Revenue Cloud, with its powerful capabilities. By leveraging CPQ custom actions, you can construct sophisticated pricing engines that enable your sales team to generate precise quotes. Throughout this series, we will explore the concept of Search Filters in Salesforce CPQ, delve into various use cases, and demonstrate the process of setting them up. By the end, you will have a comprehensive understanding of Search Filters and be equipped to implement them effectively.
CPQ (Configure, Price, Quote) software is a powerful tool that streamlines sales processes, enabling businesses to configure products, generate accurate quotes, and automate pricing. The deployment process of CPQ involves implementing it within a business’s Salesforce CRM. This includes configuring the system to meet specific requirements, integrating it with other systems like ERP and CRM, and providing training and support to ensure effective usage. CPQ deployment is a complex process that demands meticulous planning, execution, and expertise in technology and business processes.
This tutorial will guide you through the process of creating custom actions that enable displaying distinct products to different users. Additionally, we will explore how to scale the solution for multiple regions. Salesforce CPQ Search Filters enable sales reps to filter the products available for selection based on certain attributes. For instance, you could search for all the Products where Product Name contains “Laptop” keyword.
Before we begin, if you do not have a Salesforce environment with CPQ, you can easily sign up for a new one by following this link.
Steps to create search filters.
To configure search filters in Salesforce CPQ, you can follow these step-by-step instructions:
- Access the Setup menu and navigate to the “Object Manager” tab.
- Utilize the quick find box to search for “Custom Action.”
- Locate the “Label” field within the “Fields and relationships” section.
- Add the desired picklist values for the field.
- Proceed to Setup > App Setup > Create > Objects and select “Search Filter (CPQ).”
- Under the “Custom Fields & Relationships” section, select “Filter Type.”
- Within the “Values” section, click on “New” and input the desired names to group the Business Object picklist values.
Create the Custom Action
To begin creating our custom action, follow these steps:
- Open the App launcher and use the item search to find and select “Custom Action”. Then, click on the “New” button.
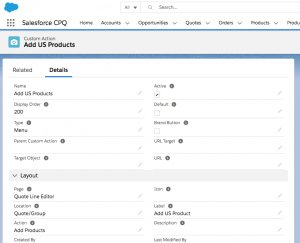
- Start by creating the first action for “US Sales”
Recreate Basic Filters and Make a Subscription Filter
Currently, within your CPQ-enabled org, there are already a few out-of-the-box filters available on the Product Selection page. To view them, simply open the filtering pane by clicking the filter button.
CPQ utilizes two methods to determine which Product fields are displayed in the filter pane. The first method involves examining the Search Filters field set on the Product object. This field set already includes Product Code, Product Name, and Product Family fields. Custom fields can also be added to the Search Filters field set. However, this method has limitations, as certain CPQ-specific fields like Subscription Type cannot be added, and control over search behaviors is limited (e.g., ‘starts with’ versus ‘contains’).
The second method, which offers more flexibility, involves creating a Search Filter record. This method allows you to add most Product fields as filters, control matching behavior, and explore additional advanced functionalities. It’s important to note that Salesforce CPQ utilizes either the Search Filters field set or the Search Filter records, but not both simultaneously. When using records, the field set is ignored. Therefore, it is recommended to recreate the Product Code, Product Name, and Product Family filters when creating other Search Filter records.
To embark on your Search Filter journey, let’s begin by creating a Search Filter record for the Product Code.
- Firstly, Click the App Launcher icon and select the Salesforce CPQ tile.
- In the navigation bar, locate and click on “Search Filters” (under the More tab, if necessary).
- Thirdly, Click on the “New” button.
- Enter “Product Code” as the Filter Name.
- Select “Product” as the Target Object.
- Choose “Product Code” as the Target Field. This combination informs CPQ about what it should search for.
- Set the Operator to “contains.” With this selection, when a sales rep searches for “usb,” CPQ will retrieve products that contain “USB” anywhere in the product code, such as “4PORTUSBHUB.” The original filter only displayed products that started with “USB.”
- Enter “10” for the Display Order.
- Lastly, click save.
Now, let’s proceed to recreate the filters for Product Name and Product Family.
- In the navigation bar, click on “Search Filters.”
- Click on “New.”
- Thirdly, enter “Product Name” as the Filter Name.
- Choose “Product” as the Target Object.
- Select “Name” as the Target Field.
- Set the Operator to “contains.”
- Enter “20” for the Display Order.
- Click “Save & New.”
- Enter “Product Family” as the Filter Name.
- Choose “Product” as the Target Object.
- Select “Product Family” as the Target Field.
- Basically, set the Operator to “equals” since picklist values, like those in the Product Family field, require an exact match.
- Enter “30” for the Display Order.
- Click “Save.
Create a Custom Action to Display Bundles in One Click
These are preconfigured sets of products that are bundled together to streamline quoting processes with CPQ.
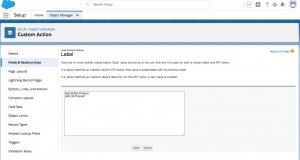
In this step, you’ll create a button called “Add Bundles” to streamline the process of adding bundles to a quote. By reducing the number of clicks required, you’ll improve the user experience for sales reps, which is crucial for high-speed sales. To include “Add Bundles” as a label for the button, update the Label field on the Custom Action object. Here’s how you can do it:
- Click the Setup icon and open the Setup page in a new tab.
- Navigate to Object Manager.
- Select Custom Action.
- Go to Fields & Relationships.
- Click on Label.
- Add a new value called “Add Bundles” to the list.
- Save the changes.
- Close the Setup tab and return to the Salesforce CPQ tab.
Now you’re ready to create a custom action record that will make the “Add Bundles” button appear in the Quote Line Editor. Follow these steps:
- Click Custom Actions in the navigation bar.
- Select New.
- Enter “Add Bundles Prefilter” as the Name.
- Specify the Display Order as 10.
- Choose the Type as Button.
- Check the Active and Brand Button options.
- Set the Location as Quote/Group.
- Choose “Add Products” as the Action.
- Select “Add Bundles” as the Label.
- Save the changes.
With these steps completed, the “Add Bundles” button will appear for users, but it will display the same products as the “Add Product” button.
Following, Create a Search Filter for Subscription Pricing
- Click the Setup icon and select Setup. This will open the Setup page in a new tab.
- In the navigation bar, click on “Object Manager.”
- Locate and click on “Search Filter” (you can use the Quick Find box for easier access).
- Click on “Fields & Relationships.”
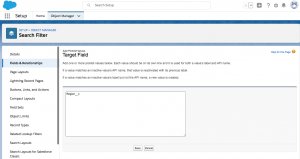
- Select “Target Field.”
- In the Values table, click on “New.”
- Enter “SBQQ__SubscriptionPricing__c.” It is important to use the API name for consistency, even if the field label changes.
- Click “Save.”
- In the Picklist Options section, find the entry for the Controlling Field and click “Change.”
- Double-click on “SBQQ__SubscriptionPricing__c” in the Product column, ensuring it turns yellow to indicate a valid choice when the Target Object is set to Product.
- Click “Save.”
- Close the Setup tab in your browser to return to the Salesforce CPQ tab. With the Subscription Pricing field added to the picklist, you can proceed to create the search filter record.
- In the navigation bar, click on “Search Filters.”
- Refresh the page by clicking the refresh button in your browser to ensure you are viewing the latest version, including “SBQQ__SubscriptionPricing__c” as a picklist value.
- Click on “New.”
- Enter “Subscription Pricing” as the Filter Name.
- Choose “Product” as the Target Object.
- Select “SBQQ__SubscriptionPricing__c” as the Target Field.
- Set the Operator to “equals.”
- Enter “40” for the Display Order.
- Click “Save.”
To Conclude:
For successful CPQ deployment, organizations should follow these best practices: involve stakeholders, provide comprehensive training, monitor data quality, develop a pricing strategy, and continuously optimize the system. Despite the complexities and challenges, addressing data quality, integration, user adoption, customization, scalability, and maintenance can lead to streamlined sales processes, improved revenue, and enhanced customer satisfaction.
FAQs
1.How do I allow users to change filter types?
In the Report settings, under the Filtering experience section, you have the ability to control whether users can change the filter type. To enable this option, follow these steps:
- Select File and then click on Settings.
- In the Settings menu, choose the option to Allow users to change filter types.
By following these steps, you can control the flexibility for users to modify the filter types according to your preferences.
2.How many filters can a Salesforce report have?
To utilize Report Filters effectively, you can easily add up to 20 additional filters to a report. Simply access the Filters pane and utilize the Add button or drag fields from the Preview pane to incorporate these filters.
3.What is the character limit for filters in Salesforce?
When applying filters to standard Text Area (Long) fields, the search capability is limited to the first 1000 characters. Similarly, for custom Text Area (Long) fields, filters restrict the search to only the first 255 characters.
4.How many parameters does filter take?
The filter() function in JavaScript accepts two parameters. The first parameter is a function that executes against the array. This function allows developers to create a wide range of operations, ranging from simple conditional statements to intricate equations.
For More Blogs – Click Here


