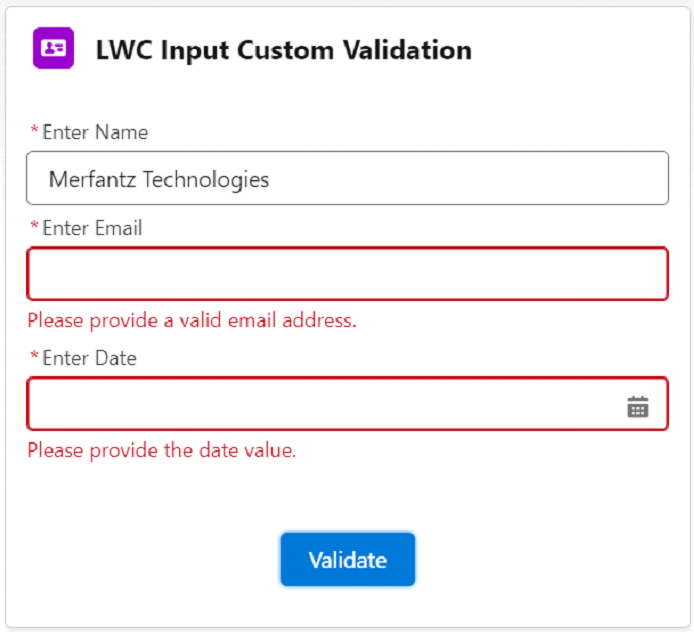
In Salesforce development, Lightning Web Components (LWCs) have emerged as the preferred framework for crafting modern, responsive web applications. Ensuring that user inputs meet specific criteria before processing or saving is a common requirement when building forms and user interfaces. This is where custom validation becomes crucial. In this blog post, we will explore how to implement custom validation in LWCs, enhancing user experience and maintaining data integrity.
We will begin by discussing the importance of custom validation and the scenarios where it is essential. Then, we will provide a step-by-step guide with code examples to demonstrate how to create and apply custom validation in your LWC forms.
Importance of Custom Validation
Custom validation is essential for several reasons:
⦁ Data Integrity: It ensures that user-entered data meets business requirements, preventing incorrect or incomplete data from being saved.
⦁ User Experience: It provides immediate feedback, guiding users to correct their input in real-time.
⦁ Error Prevention: It reduces the likelihood of errors that could occur if invalid data is processed by the application.
Custom validation can be used to check various conditions, such as ensuring a field is not left blank, validating the format of an email address, or ensuring that a date falls within a specific range.
Implementing Custom Validation in LWCs
Let’s walk through the process of implementing custom validation in a Lightning Web Component.
Step 1: Create the LWC
First, create a new Lightning Web Component. For this example, we’ll create a component named customValidationForm.
sfdx force:lightning:component:create –type lwc –componentname customValidationForm –outputdir force-app/main/default/lwc
Step 2: Component Markup
In the component’s HTML file (customValidationForm.html), create a form with some input fields. We’ll include an example with a name field and an email field.
<template>
<lightning-card title=”LWC Input Custom Validation” icon-name=”standard:contact”>
<div class=”slds-var-p-around_small”>
<lightning-input class=”nameVal” label=”Enter Name” type=”text” required></lightning-input>
<lightning-input class=”emailVal” label=”Enter Email” type=”email” required></lightning-input>
<lightning-input class=”dateVal” label=”Enter Date” type=”date” required></lightning-input><br/><br/>
<lightning-button class=”slds-align_absolute-center” label=”Validate” variant=”brand”
onclick={handleValidation}></lightning-button>
</div>
</lightning-card>
</template>
Step 3: Component JavaScript
In the component’s JavaScript file (customValidationForm.js), define the logic for handling input changes and validating the form.
import { LightningElement, track } from ‘lwc’;
export default class Customvalidationlwc extends LightningElement {
handleValidation() {
let nameCmp = this.template.querySelector(“.nameVal”);
let dateCmp = this.template.querySelector(“.dateVal”);
let emailCmp = this.template.querySelector(“.emailVal”);
if (!nameCmp.value) {
nameCmp.setCustomValidity(“Please provide the name value”);
} else {
nameCmp.setCustomValidity(“”); // clear previous value
}
nameCmp.reportValidity();
if (!dateCmp.value) {
dateCmp.setCustomValidity(“Please provide the date value.”);
} else {
dateCmp.setCustomValidity(“”); // clear previous value
}
dateCmp.reportValidity();
if (!emailCmp.value) {
emailCmp.setCustomValidity(“Please provide a valid email address.”);
} else {
emailCmp.setCustomValidity(“”); // clear previous value
}
emailCmp.reportValidity();
}
}
Final Output :
Conclusion:
By following these steps, you’ve successfully created a Lightning Web Component with custom validation. This approach ensures your forms provide immediate feedback to users and maintain high data integrity. Custom validation is a powerful tool in your LWC toolkit, enabling you to build robust, user-friendly applications on the Salesforce platform.
Related Links:
1),https://www.merfantz.com/blog/validation-rule-using-javascript


