Step 1: Create New Visualforce Page.
Page Name: NewProduct
Apex Code:
<apex:page standardController=”Customer__c” extensions=”NewProductController”>
<apex:form >
<apex:pageBlock >
<apex:pageblockSection Title=”Customer” columns=”1″>
<apex:outputField value=”{!customer.Name}”/>
<apex:outputField value=”{!customer.Shipping_Address__c}”/>
</apex:pageblockSection>
<apex:pageBlockSection Title=”Product” columns=”1″ id=”p”>
<apex:commandLink value=”Add Product” action=”{!addproduct}” reRender=”p”/>
<apex:variable value=”{!0}” var=”proNum”/>
<apex:pageBlockTable value=”{!product}” var=”pro”>
<apex:column headerValue=”No.”>
<apex:outputText value=”{0}” style=”text-align:center;”>
<apex:param value=”{!proNum+1}”/>
</apex:outputText>
</apex:column>
<apex:column headerValue=”Customer”>
<apex:outputfield value=”{!pro.Customer__c}”/>
</apex:column>
<apex:column headerValue=”Product Name”>
<apex:inputfield value=”{!pro.Product_Name__c}”/>
</apex:column>
<apex:column headerValue=”Quantity”>
<apex:inputfield value=”{!pro.Quantity__c}” required=”false”/>
</apex:column>
<apex:column headerValue=”Price”>
<apex:inputfield value=”{!pro.Price__c}”/>
</apex:column>
<apex:column >
<apex:commandLink value=”Remove” action=”{!removepro}” reRender=”p”>
<apex:param name=”proIndex” value=”{!proNum}”/>
</apex:commandLink>
<apex:variable var=”proNum” value=”{!proNum+1}”/>
</apex:column>
</apex:pageBlockTable>
</apex:pageBlockSection>
<apex:commandButton action=”{!save}” value=”Save”/>
<apex:commandButton action=”{!cancel}” value=”Cancel”/>
</apex:pageBlock>
</apex:form>
</apex:page>
Controller Code:
Public class NewProductController
{
public Customer__c customer{get; set;}
public List<Product__c> product{get; set;}
public Integer proIndex {get; set;}
public Id CusId;
public NewProductController(ApexPages.StandardController controller)
{
customer = new Customer__c();
CusId = apexpages.currentpage().getparameters().get(‘parentid’); //Get the Customer Id from the URL
customer = [select id,name,Shipping_Address__c from Customer__c where Id =: CusId]; //Get the Customer Details
product = new List<Product__c>();
product.add(new Product__c(Customer__c = CusId));
}
public void addproduct()
{
product.add(new Product__c(Customer__c = CusId)); //When Add Product is Clicked it add the List to the Table.
}
public void removepro()
{
proIndex = Integer.valueOf(ApexPages.currentPage().getParameters().get(‘proIndex’));
product.remove(proIndex); //Remove the Product from the List
}
public pageReference save()
{
upsert product; //Used to Update Product and insert the new Products.
update customer; //Used to Update the Customer.
pageReference re = new pageReference(‘/’+CusId); //Return to the Same Customer Page.
return re;
}
public pageReference cancel()
{
pageReference re = new pageReference(‘/’+CusId); //Return to the Same Customer Page.
return re;
}
}
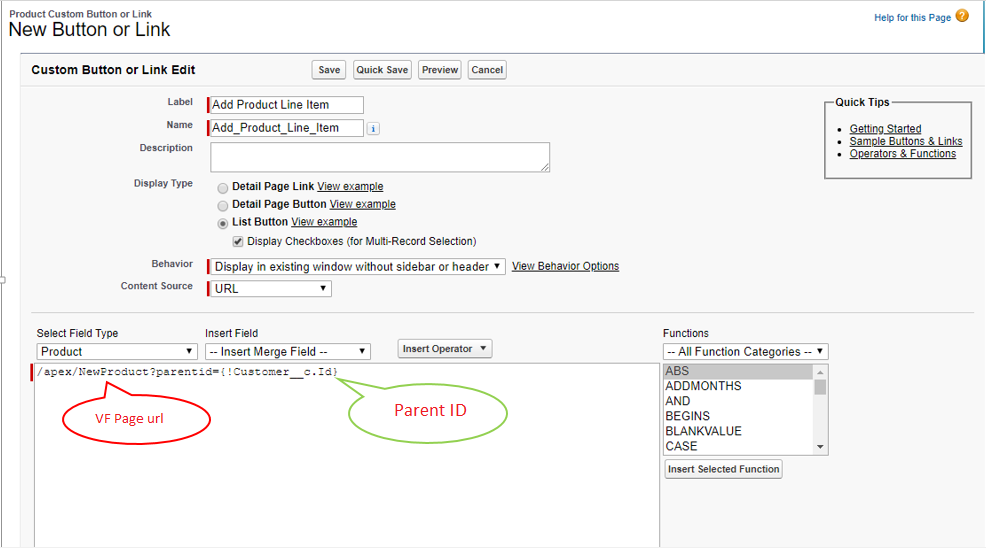
Step 2: Create new Custom List Button in Child Object for apex page
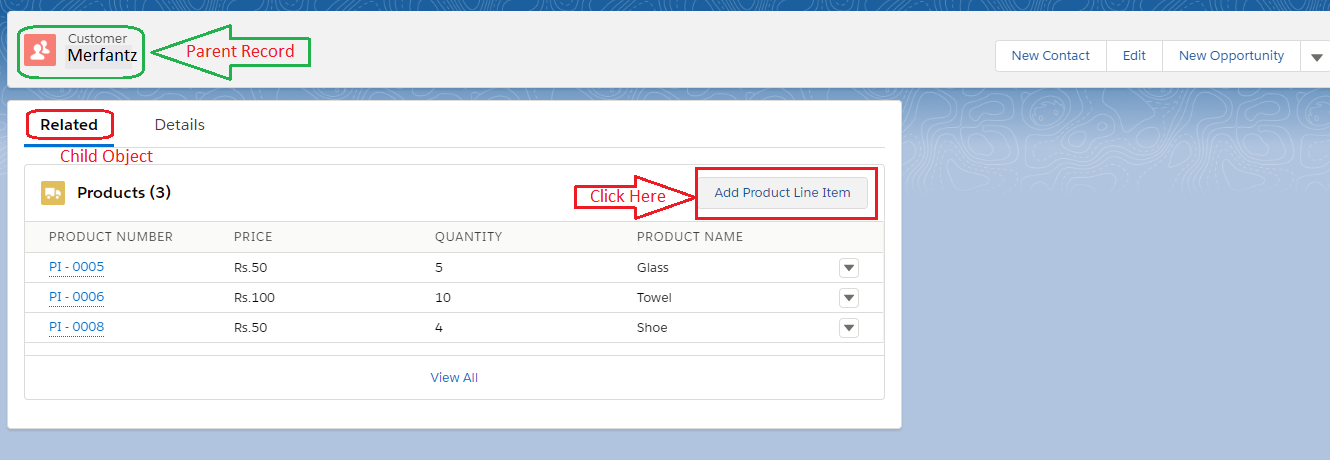
Step 3: Go to Parent Object Page Layout
Step 4: Add the Custom Button into the Child Related List Tab
Step 5: And Save the Parent Object Page Layout
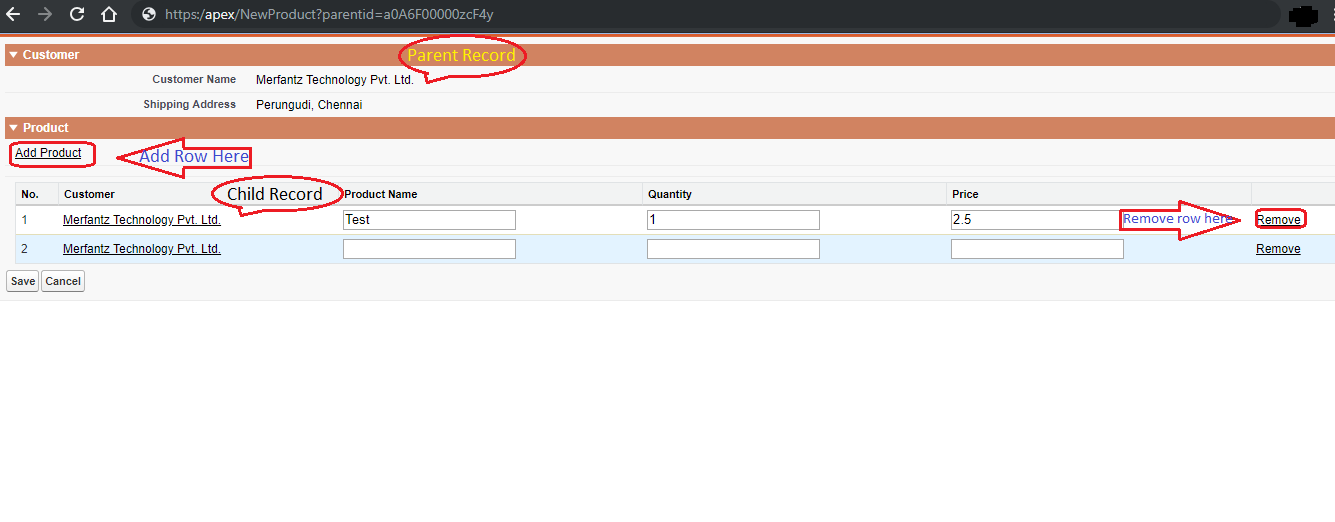
Result:
We are the ISV Partners and Please reach us for custom development => www.merfantz.com


