Introduction
Salesforce CPQ (Configure, Price, Quote) serves as a powerful tool that streamlines and automates the quoting process for complex product configurations. By leveraging Salesforce CPQ, businesses can create bundles of products, effectively grouping related items into a comprehensive package. This approach provides customers with a convenient and cost-effective solution to purchase multiple items simultaneously. In Salesforce CPQ, the bundle represents a fundamental concept. To put it simply, a bundle is an assemblage of products that are frequently sold together.
A bundle product contains several records. Additionally, the configuration attribute serves as a centralized control mechanism for options with similar fields. By specifying a value for the configuration attribute, you can ensure consistency among the related options, as the chosen value will be applied uniformly. This attribute acts as a bridge, connecting and influencing multiple options simultaneously.
Bundles of All Shapes and Sizes
In Salesforce CPQ, creating a quote involves selecting products, and some products are meant to be sold together. This brings us to a key concept: the bundle. There are three types of bundles, each described with a food analogy.
- Static bundle: This bundle always includes the same products in fixed quantities. It’s like a BLT sandwich with bacon, lettuce, tomato, and two slices of toast. No variations allowed.
- Configurable bundle: This bundle allows customization within certain limits. It’s similar to building your own burrito, where you choose the beans, salsa heat, and sour cream. Each customer gets a personalized burrito.
- Nested bundle: It’s a bundle within another bundle. For example, a configurable hamburger bundle nested inside a combo meal bundle. While nesting bundles is possible in Salesforce CPQ, it’s recommended to limit nesting to one or two levels.
Add Your First Bundle to a Quote
Working with bundles is effortless from a user perspective. Sales reps can simply add bundles to quotes, treating them as regular products. To illustrate, let’s see how to add a configurable bundle to a quote.
In this example, Edge Communications desires a high-performance laptop, and AW Computing offers a laptop bundle with customizable features such as processors and RAM. Follow these steps:
- Click the App Launcher icon and select the Salesforce CPQ tile.
- Navigate to the All Accounts list view under the Accounts section in the navigation bar.
- Choose Edge Communications from the list.
- Click on the Related tab.
- Select “Laptop for Front Office” from the Opportunities related list.
- Choose Q-00000 from the Quotes related list.
- Click on Edit Lines.
- Note that the initial page load may take a few minutes, but subsequent loads will be faster.
- Click on Add Products.
- Check the box next to the 15″ Laptop product.
- Click on Select.
- The configuration page will display available choices to upgrade the laptop.
- Opt for the most premium upgrades for Processor, Memory, and Storage.
- Click on Save.
- The Quote Line Editor will show the bundle, including the 15″ laptop, CPU 2.8GHz i7, RAM 16GB, and SSD hard drive 512GB products.
- Click on Save.
To ensure that sales reps configure a nested bundle, set the Configuration Type to Required. This action triggers the display of a red line, similar to the red line that appears next to a required field. Once the sales rep configures the nested bundle, the red line disappears, allowing them to save the outer bundle to the Quote Line Editor. However, if the nested bundle is left unconfigured, an error message will be displayed when attempting to save the outer bundle.
Multiple Bundles
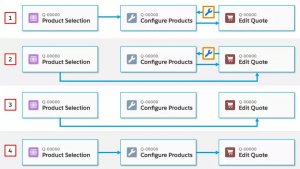
In some cases, a sales rep selects two bundles from the product selection page, and both of these bundles require configuration. To facilitate this process, the configuration page features an expandable bar on the left-hand side. When expanded, this panel displays a list of configurable bundles. By default, clicking on a bundle from the sidebar only shows that specific bundle. However, by changing the Multiple Bundles View package level setting to Classic, all bundles can be viewed simultaneously. In Classic mode, the sidebar functions more like a bookmark bar, scrolling the page to the selected bundle. To access the package level settings, navigate to Setup, search for “Installed Packages” in the Quick Find box, click on “Installed Packages,” and locate Salesforce CPQ. Finally, click on “Configure” next to Salesforce CPQ.
Keep Bundles Together
Typically, when a representative organizes their quote lines using groups, they prefer to have all products within a bundle appear in a single group. Additionally, they want to ensure that the entire bundle remains intact when moved into a different group. By default, the Keep Bundles Together package level setting is enabled, but if the decision is made to allow reps to split bundles across multiple groups, the setting can be disabled. It is important to remind sales reps to exercise caution and avoid splitting bundles unnecessarily.
As the Salesforce admin, you have the ability to control the experience of adding bundles to a quote, ensuring that sales reps can easily assemble their quotes. In the next unit, we will explore how admins can actively create these impressive bundles.
Use Product Options to Construct Bundles
A Product Option (for simplicity, we’ll just call this an option from now on) does more than just connect a follower product to the lead product. It also describes how the follower behaves in the bundle. Here are a few option record fields that control option behavior.
Number: Sorts the options on the Configure Products page. The lower the number, the higher in the list the option appears. Tip: Number your options in increments of 10. That way, if you need to slip a new option between the first (10) and second (20), you can number it 15 without having to renumber everything. Selected: Selects the option by default. Choose Selected for an option when you want to give your sales reps guidance about what’s typical for a configuration. Required: Selects the option and prevents sales reps from deselecting it. The selection box is grayed out. – rewrite in active voice and include transition words
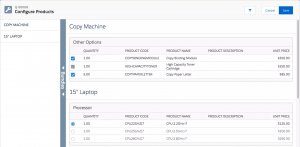
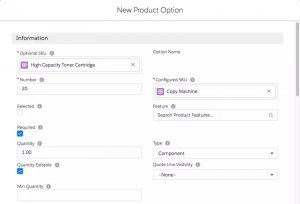
Within the Option record for the High Capacity Toner Cartridge, it is notable that the Number field is assigned a value of 20, and the Required Checkbox is specifically marked as true. Transitioning to the screenshot of the Configure Products page, we can observe the active manifestation of the option. Positioned as the second item in the list, the checkbox associated with the toner option is visibly checked and grayed out, distinctly signifying its mandatory nature.
Creating a Bundle
To create a bundle, the process is simplified with just a few clicks. Let’s walk through the steps of creating a copy machine bundle, which consists of the copy machine itself, a binding module, a high capacity toner cartridge, and a case of paper. The copy machine serves as the lead product, and we encourage sales reps to promote the binding module by preselecting it. The toner cartridge is mandatory, and we suggest starting with a quantity of five cases of paper.
- Navigate to the navigation bar and click on “Products,” then choose the “All Products” list view.
- Select the “Copy Machine” product.
- Access the “Related” tab.
- In the “Options” related list, click on “New.”
- Use the search field in the “Optional SKU” section to find and select the “Copy Binding Module.”
- Enter the value “10” in the “Number” field.
- Check the “Selected” box.
- Specify a quantity of “1” in the “Quantity” field.
- Finally, click “Save” to save your changes.
FAQs
1.How do I create nested bundles in Salesforce CPQ?
To create a nested bundle, you can assign a bundle product to the Optional SKU field within an option record. When users configure the top-level bundle, they will be able to observe a configuration icon on the quote line associated with the option that includes the second bundle. This particularly allows for a seamless configuration experience and facilitates the management of complex product bundles.
2.What is a CPQ bundle in Salesforce?
Salespersons or customers have the ability to select CPQ bundles while creating a price quote. These bundles consist of groups of products that are sold together. By utilizing CPQ bundles, customers are empowered to make multiple item purchases simultaneously, while businesses can effectively promote the sale of related items as a cohesive package, thereby delivering enhanced value.
3.What is the bundle structure in CPQ?
The bundle is a central concept in Salesforce CPQ. Simply put, a bundle is a group of products that are commonly sold together. There are three key objects that define bundle structure: products, options, and features. Bundles are made of products.
4.What is product bundling with example?
Product bundling basically a technique in which several products are grouped together and sold as a single unit for one price. This strategy is used to encourage customers to buy more products. McDonald’s Happy Meals are an example of product bundles.
5.What is bundle strategy?
Bundling is certainly a marketing strategy where companies sell several products or services together as a single combined unit. Altogether,the bundled products and services are usually related, but they can also consist of dissimilar items which appeal to one group of customers
For more blogs: Click here


