Introduction
In today’s fast-paced business environment, organizations need efficient tools to streamline their service schedules and track attendance effectively. Salesforce, a leading customer relationship management platform, offers robust customization options for service schedules and attendance tracking. In this blog post, we will explore step-by-step instructions on how to customize these features in Salesforce.
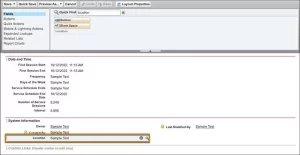
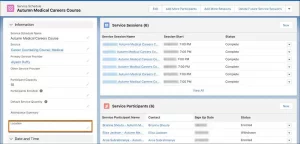
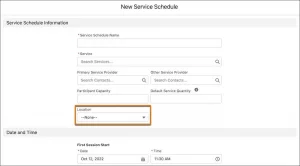
To enhance the usefulness of your service schedules, you can customize the tracked information on service schedule records. Start by customizing the fields of the Service Schedule object. By default, a service schedule includes fields for service tracking, service providers, participant capacity, and default service quality. However, if there is a need to track the location of a class, create a new field, incorporate it into the page layout, and include it on the New Service Schedule page.
While the attendance tracker in Salesforce operates similarly to other Salesforce apps, some users may be unfamiliar with the customization process. This document particularly aims to address common customization requests and provide guidance. The visual force page and trigger are 2 areas that are not customizable.
Configure Service Schedules
Many organizations actively offer one-time or recurring services for individuals or groups. For instance, your organization actively provides classes, mentoring sessions, support groups, community outreach events, or other types of events.
In order to set up service schedules, several essential steps need to be followed.
- Click
 , then click Setup.
 - Click the Object Manager tab.
- In the list of objects, click Service.
- Click Page Layouts, then click Service Layout.
- From the palette, click Related Lists and drag the Service Schedules and Service Participants related lists to the page layout.
- Click Save.
Additionally, if you have previously customized the Program Engagement and Contact pages, you will need to incorporate the Service Participants related list into both pages.
- Click on Setup, then navigate to the Setup page.
- Switch to the Object Manager tab.
- In the list of objects, locate and click on either Program Engagement or Contact.
- Click on Page Layouts, and select the Case Management layout for the chosen object.
- From the palette, find the Related Lists section and drag the Service Participants related list onto the page layout.
- Once done, click Save to save the changes.
- If you have also customized the other object’s page, Program Engagement or Contact, repeat the above steps for that object as well.
Customize Service Schedules
To customize the information collected when creating a new service schedule, follow these steps:
- Click on Setup and navigate to the Setup page.
- Switch to the Object Manager tab.
- In the list of objects, locate and click on Service Schedule.
- Click on Field Sets.
- Select the Service Schedule Information field set.
- Drag the desired fields from the palette and drop them into the Field Set.
- If needed, remove fields by dragging them out of the Field Set.
- Once you have made the necessary adjustments, click Save to save your changes.
By following these steps, you can actively customize the information collected when users create a new service schedule by clicking “New” on the Service Schedules tab.
To customize the fields for adding service participants in the new service schedule, follow these steps:
- Click on Setup and navigate to the Setup page.
- Switch to the Object Manager tab.
- In the list of objects, locate and click on Program Engagement.
- Click on Field Sets.
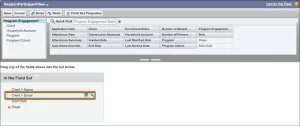
- Select the SessionParticipantView field set.
- In the palette, choose an object under Program Engagement, such as Household Account.
- Drag the desired fields from the palette and drop them into the Field Set. For example, you can drag the “Account Name” field under Household Account.
- If needed, remove fields by dragging them out of the Field Set.
- Once you have made the necessary changes, click Save to save the modifications.
By following these steps, you can actively customize the Add Service Participants fields in the New Service Schedule.
Now, let’s explore this change in the context of creating a new service schedule.
- Locate and select Program Management from the App Launcher ().
- Click on the Service Schedules tab, which might be found under the More section.
- Click on the New button.
- Provide a Service Schedule Name and select a Service. Then, click Next. (Any selection will suffice, as we are not actually creating a new service schedule.)
- Click Next.
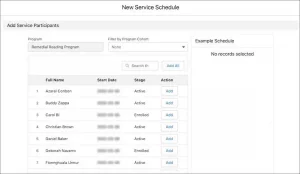
- Verify that under the Add Service Participants section, you are currently displaying Full Name, Start Date, and Stage information for each potential participant.
Given the limited space available on this list, exercise caution in choosing the amount of information to be shown to your users in this view. It is crucial to prioritize and select only the most relevant data to optimize the display and usability for your users. By following these steps, you can actively observe the change in the display of participant information when creating a new service schedule.
Customize Service Schedule Attendance Tracking
The Track Attendance component, available on a Service Session, provides users with the ability to create Service Deliveries for all attendees or absences in a session. This feature offers a convenient and efficient way to generate Service Deliveries for all participants through a single interface. To utilize Track Attendance, users must possess PMM: Deliver or PMM: Manage permissions.
In its default configuration, Track Attendance collects the following information to be included in each Service Delivery:
- Client: The Service Participant associated with the related Service Schedule.
- Quantity: The attended service quantity, indicated using the Unit of Measurement from the Service linked to the Service Schedule. For instance, if the Service uses “Hours” as the Unit of Measurement, users will see the quantity in hours. Additionally, users can set a Default Service Quantity on a Service Schedule to automatically populate the Quantity field. Please refer to the “Schedule Services” section for more information.
- Attendance Status: The status of the Service Participant during the session, which can be categorized as Present, Unexcused Absence, or Excused Absence. You can customize the values of Attendance Status by referring to the “Customize Attendance Status Values” section.
To add to the information collected using Track Attendance, customize the Attendance Service Deliveries field set.
- Click
 , then click Setup.
 - Click Object Manager.
- Click Service Delivery.
- Click Field Sets.
- Click Attendance Service Deliveries.
- Drag fields to or from the palette and the In the Field Set box. Don’t remove the Client or Attendance Status fields.
- Click Save.
Now that we have added the field, let’s explore how it functions.
Follow these steps:
- Locate and select Program Management from the App Launcher ( ).
- On the Program Management homepage, find the Recent Sessions component and click on a pending session.
- Examine the Track Attendance component on the service session record. You will notice that your newly added field is now included.
- Feel free to test out the functionality by utilizing the new field if desired.
By following these steps, you can actively observe and test the newly added field within the Track Attendance component on the service session record.
Customize Attendance Status Values
By default, the Attendance Status values for Track Attendance are as follows: Present, Excused Absence, and Unexcused Absence. The Present status is automatically assigned to all Service Participants. When Excused Absence or Unexcused Absence is selected, the Quantity of the corresponding Service Delivery is set to zero.
It is advisable to retain the default Attendance Status values and introduce custom values only when necessary. However, please note that custom values will not automatically adjust the Quantity field to zero.
- Click on Setup, then access the Setup page.
- Select Object Manager.
- Locate and click on Service Delivery.
- Choose Fields & Relationships.
- Click on Attendance Status.
- Scroll down to the Values section.
- Proceed to add or edit the Attendance Values as needed. Please ensure that you do not modify the API Name of the default Attendance Status values.
By adhering to these steps, you can customize the Attendance Values for the Service Delivery object while being cautious not to change the API Name of the default Attendance Status values.
FAQS
1.Is there a way to streamline scheduling in Salesforce?
Most likely not. There are alternatives that can streamline scheduling, while also ensuring effective communication with your customer.
2.How to schedule or unschedule an appointment in salesforce?
To schedule an appointment with a Salesforce Support Engineer, you can follow these steps:
- Click View Cases in the “Support & Services” tile.
- Click the Case you would like to schedule.
- Click Schedule Appointment.
- Click Get Started.
- Choose a date and time.
- Click Schedule.
In addition, you can use Salesforce Scheduler to manage appointments. Salesforce Scheduler gives you the tools you need to simplify appointment scheduling in Salesforce. You can create a personalized experience by scheduling customer appointments—in person, or by phone or video—with the right person at the right place and time.
3.What is time & expense attendance for Salesforce?
Time and expense attendance for Salesforce is a cloud-based time and attendance solution built for managing today’s workforce. Certainly, with a time tracking system in Salesforce, you’ll know exactly how much time you spend on a client’s project.
For More Blogs: Click here

